I live in London, and I wanted to be able to go surfing more often. After considering a range of options, I concluded having a campervan was the best solution. My goal was to do it quickly so it was all about keeping it simple, which meant no embedded electrical features.
Note that it was 21 days of building, but over the course of a year. I would block a weekend and do a full 2 days at a time. This helped because the time between weekends gave me time to think about solutions, and research and order in parts.
How long did it take?
Research vans & buy one = 7 evenings over 1 month, + 1 day retrieving van
Van design/research = 4/5 days
Van build = 21 days
How much did it cost?
£8,200 for van + £2,844 for parts = £11,044
Below is my journey from idea to finished campervan. Just remember, it will take longer than you think and sometimes you’ll question why you ever started such a project. But it’s all worth it.
Contents
- Define the requirements
- Find inspiration
- Choose the van
- Buy the van
- Sketch overall design
- Research key components
- Create project plan
- The build
- Video of the build
- Video of the final van (Coming soon)
1. Define the requirements
What will the main purpose of your campervan be for?
Weekend escapes or longer trips? Relatively decent roads or off-road?
What are your main requirements?
For me, my main requirements were:
- Mainly for weekend surf trips
- Space to sit down and eat
- Space for a double bed
- Place to cook
- Sink to wash up
- Surfboard rack
- At least 2 seats
- Keep in London so needs a Euro6 engine
- Heating for the winter – heated blanket, if I realise I need a diesel heater I can install it later down the line
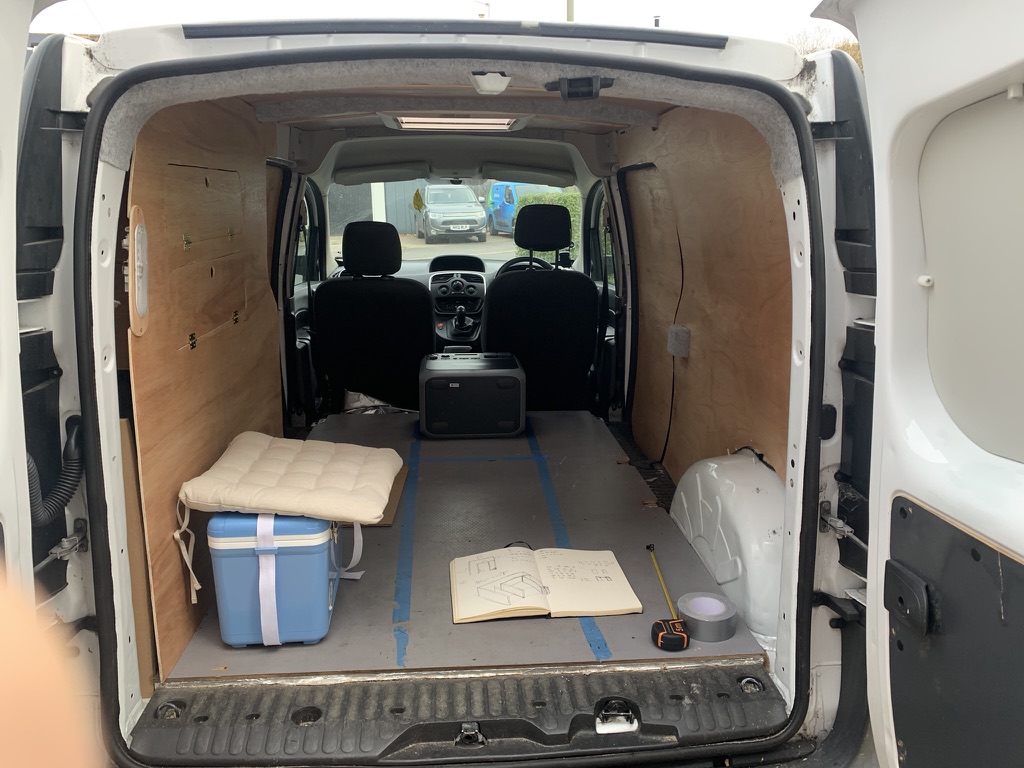
- Cool box as a fridge
- Water storage
2. Find inspiration
I looked at a lot of van designs online and saved ideas I liked. But when I came across this youtube video of a Renault kangoo maxi conversion, it was the best I’d found. I basically copied it and added a few custom changes for mine.
This website https://www.thevanconversion.com/planning is incredibly useful at helping you understand what you need to consider.

3. Choose the van
Variables to consider:
- Define your total budget – mine was 10k (8k for van, 2k for build).
- Fuel or electric – As much as I would’ve preferred to choose the more environmentally friendly option, it was more expensive to buy, I had no driveway to charge it at home, and the range would have meant trips to Cornwall would have needed a full charge half way.
- Size – generally the bigger it is, the more expensive it is to buy and insure it. I just wanted it to fit a double bed with a place to cook and put surfboards on the roof.
- Insurance – find models you like and look up how much insurance would be.
- Mileage – I chose what van I wanted and then just looked at what the lowest mileage would be for about 8k, which was around 80,000 to 90,000 miles.
Below is a table I made when first researching to get an idea of van costs:
| Vans (Euro6) | Vehicle price inc. VAT | Miles | Insurance in London (5,000 miles / year |
| Vauxhall Combo 2015 | £5,995 | 95,000 miles | £1,233.33 |
| Renault Kangoo Maxi – 2018 – length 4666 mm – 52mpg | £7,680 | 93,255 miles | £1,279.92 |
| Peugeot Partner LWB – 2018 – length 4380 mm – 61mpg | £8,394 | 86,000 miles | £1,244 |
| Peugeot Expert – 2017 | £9,588 | 97,000 miles | £1,400.54 |
| Citreon dispatch – 2018 | £8,995 | 91,000 miles | £1,475.75 |
| Renault Trafic | £8,994 | 97,000 miles | £1,594 |
| Toyota Proace – 2017 | £8,994 | 99,989 miles | £1,433 |
| Vauxhall combo – 2019 | £8,700 | 93,853 miles | £1,194.97 |
| Vauxhall Vivaro | £10,740 | 98,900 miles | £1,860 |
| Citreon Berlingo LWB -2020 | £10,788 | 98,000 miles | £1,442.26 |
| Citreon Relay – 2018 | £12,240 | 97,000 miles | £2,099.67 |
Shortlist: Renault Kangoo Maxi (LWB) or Peugeot Partner (LWB) or Citreon Berlingo (LWB)
4. Buy the van
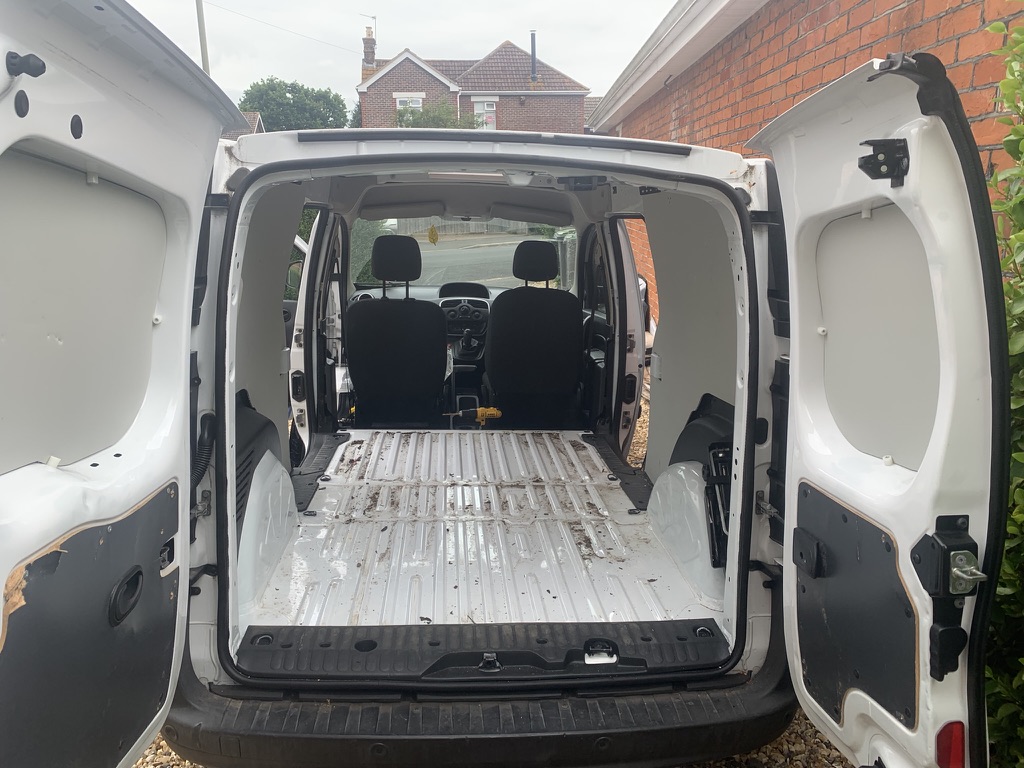
I regularly checked https://www.autotrader.co.uk/vans for relevant models, after being too slow and missing a few, I found a 2018 Renault Kangoo Maxi of about 84,000 miles for £8,200 inc. VAT at https://www.eurofleetsales.com/. After a check and a test drive I bought it there and then and drove it home.
Checklist I used when buying the van:
- Check no rust on body and paint colour is consistent
- Check the lights, air conditioning and radio work as expected
- Ensure the locking system functions correctly
- Inspect the tread depth and condition of the tyres
- Take the van for a test drive to confirm pedals, steering and suspension are all satisfactory
- Check the history – was it serviced at recommended miles/intervals?
- Check there’s a logbook
- Check there’s x2 sets of keys (Mine only had one set but i got another set cut straight away for £150 which was very easy)
- What was it used for before? Better to have been used for motorway miles rather than zipping around a city
- Check there’s a V5C
- Is there a warranty? Mine had 3 months
- Drive away insurance?
- Are there plastic panels to cover up damage?
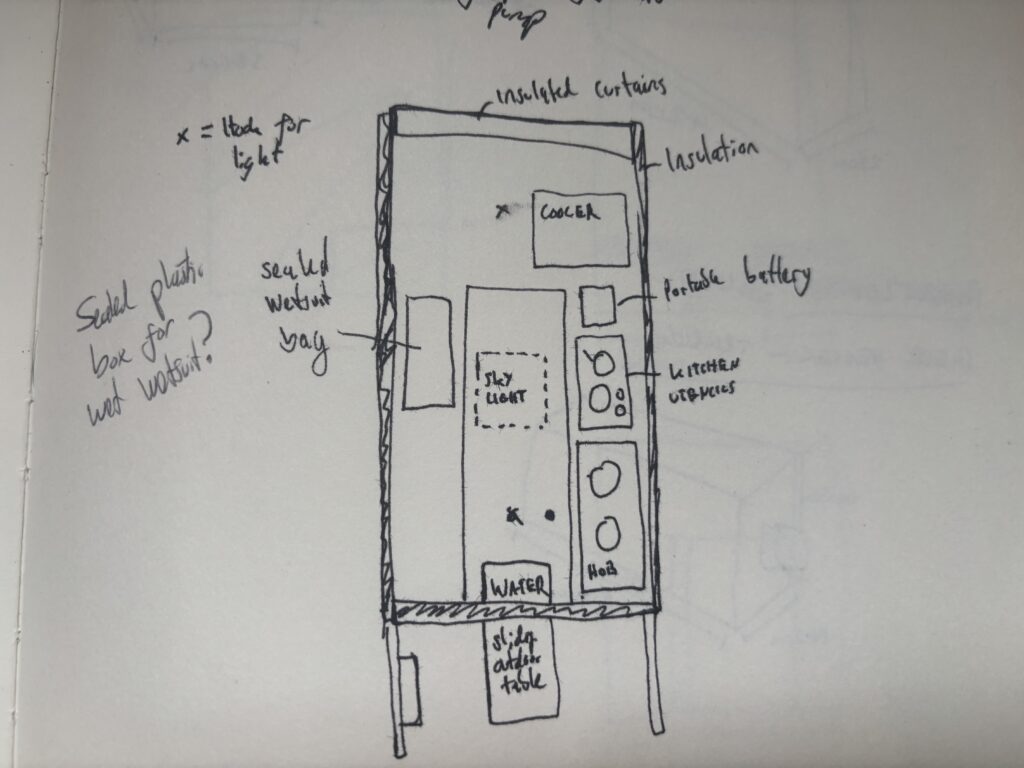
5. Sketch the overall design
Design the overall layout of your van and materials including:
- Where will the bed go? Will it be put away, if so how?
- Where will the seating area be?
- Where will the cooking area go?
- Where will the cooler go?
- Where will the battery go?
- Where will there be storage?
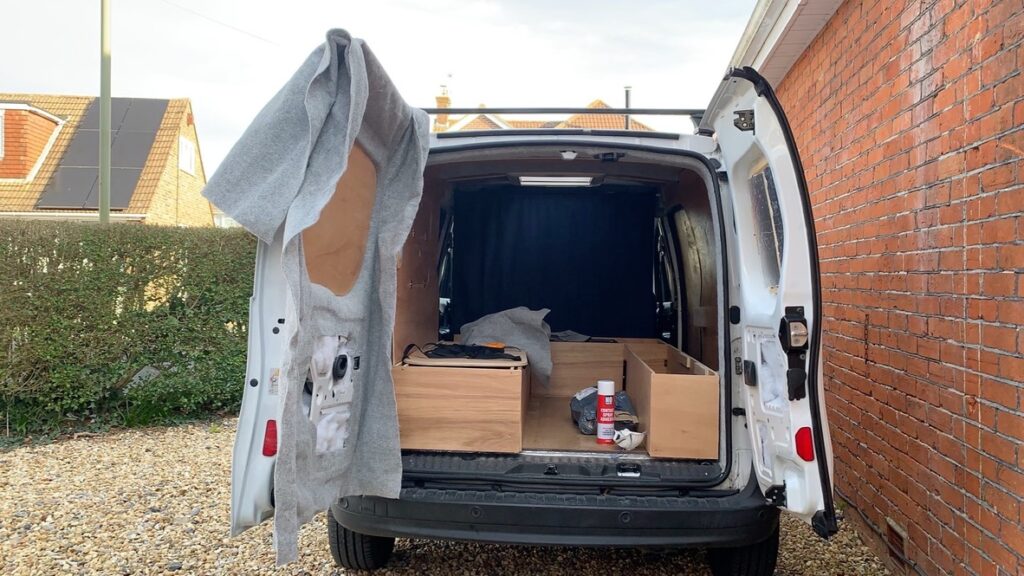
- What materials will be used? I went for Ply wood for panels and frame, and carpet for others bits of exposed metal (you don’t want any exposed metal as otherwise you could get condensation and get water dripping on you)
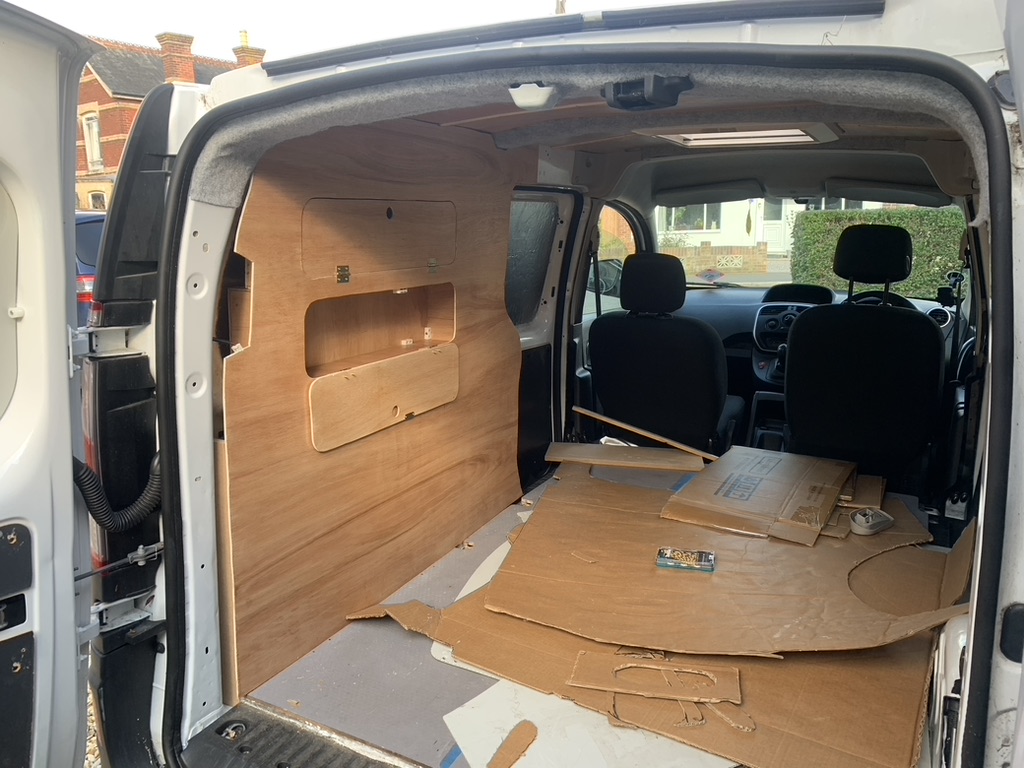
You can use card board boxes and tape to see what the layout feels like in the van itself.
6. Research key components
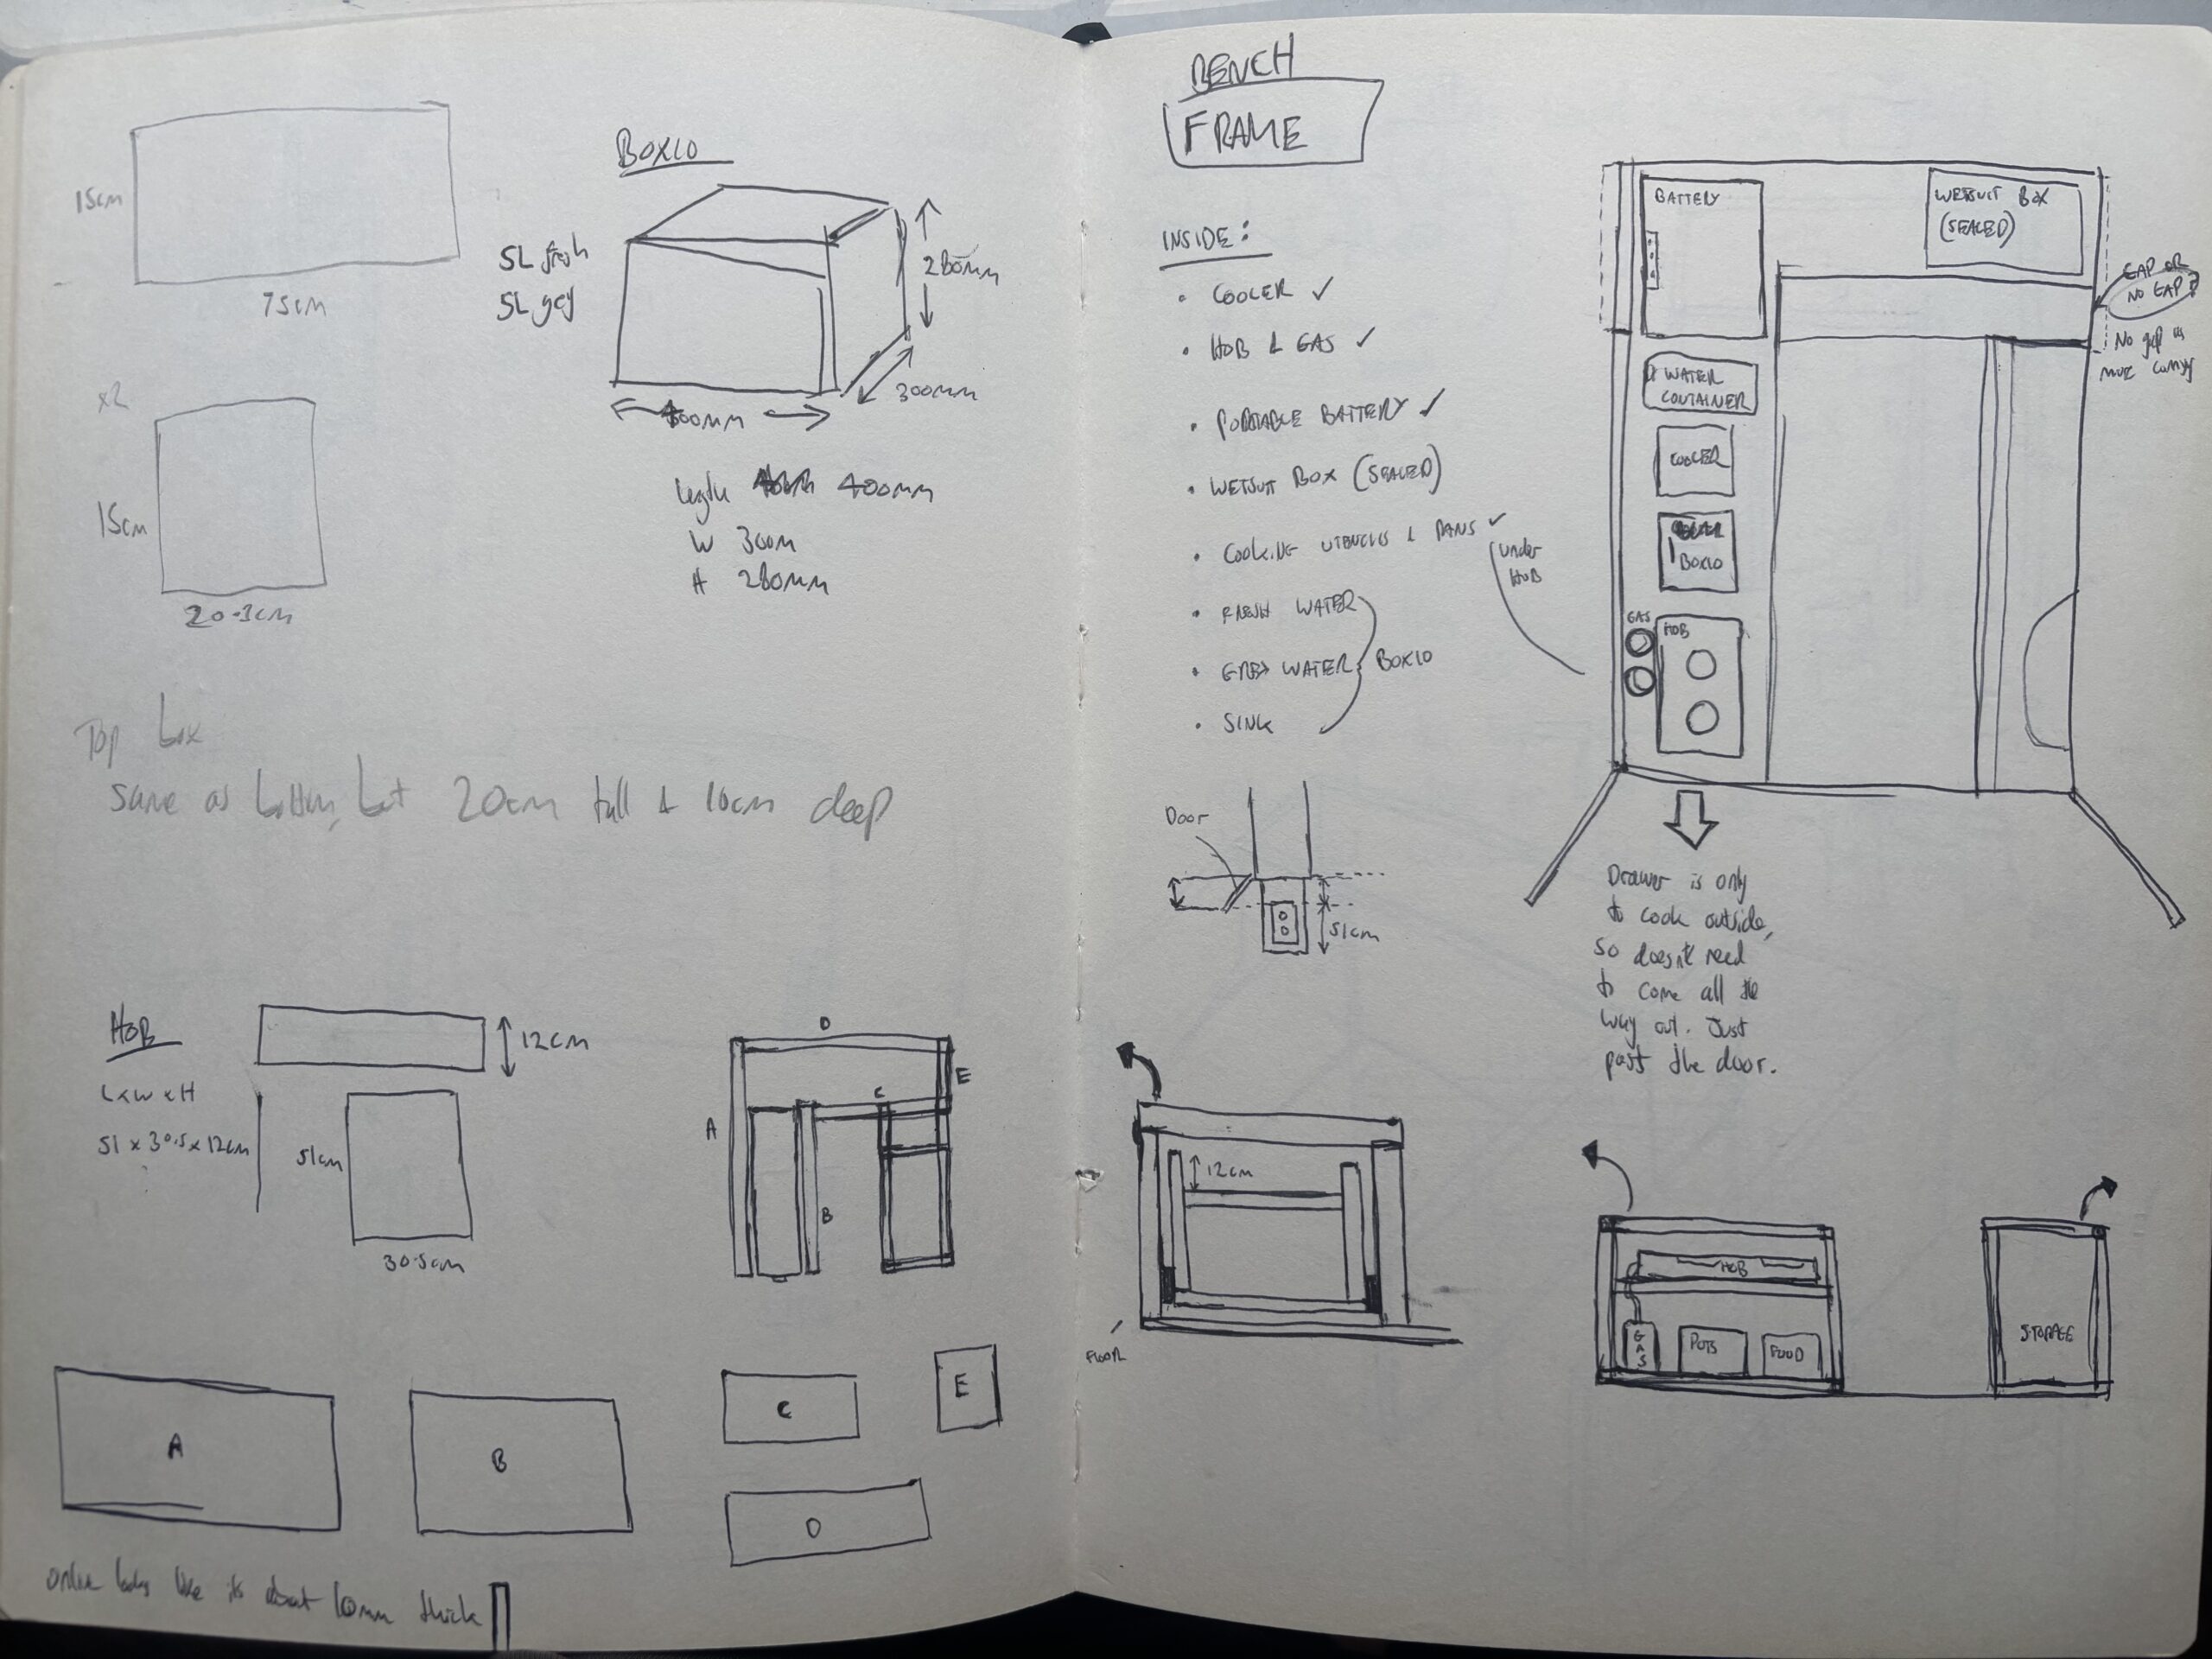
As the van was small, I wanted to design it so that the essential parts would fit perfectly, so I found the parts beforehand to have the exact dimensions.
I considered a ‘van conversion kit’ for a while, but I wanted the freedom to design it exactly as I want it to maximise space, and I felt that the carpentry part would be the fun part of it. It was also cheaper to build it all myself.
- Heating – I went for a heated blanket for simplicity. Silentnight Dual Control Electric Blanket Double.
- Battery – I bought a portable BLUETTI AC200P 2,000W 2,000Wh battery which would easily charge my phone and battery, but also provide about 11 hours of heated blanket. If I want to, I can easily get a plug-in solar panel set-up that connects to this.
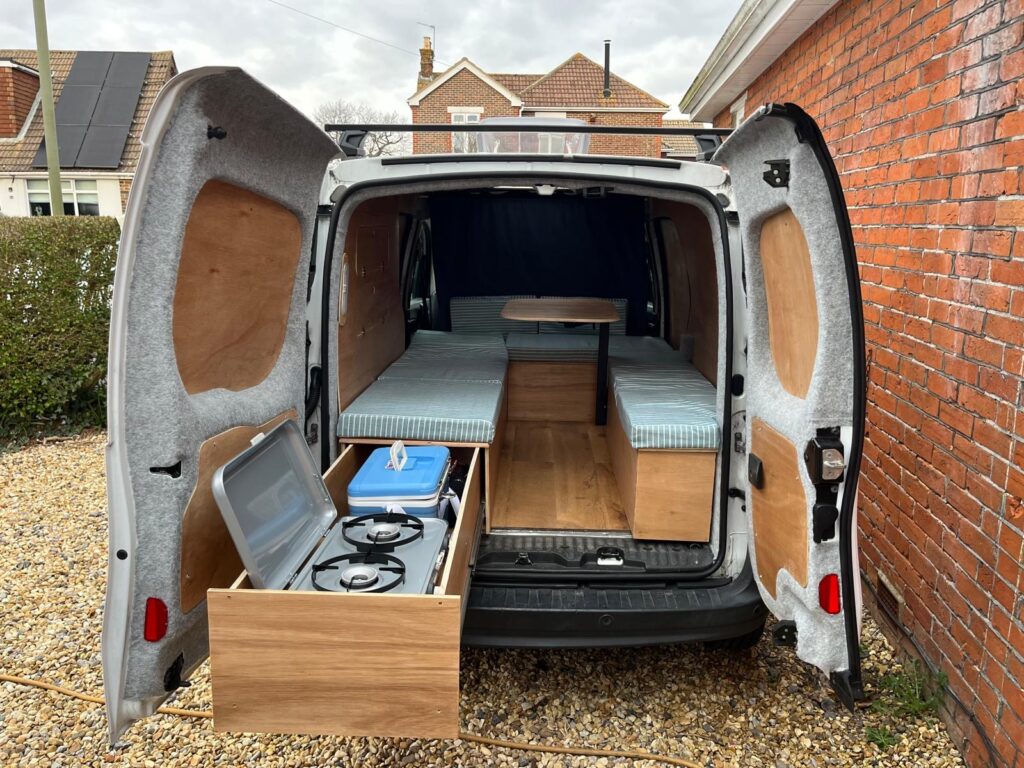
- Cooler as a fridge – This 12L Engel cooler works perfectly and keeps stuff cold for a good few days.
- Portable gas stove – This Campingaz double stove cooker works well although having both rings on results in quite small flames.
- Sink – I found this Boxio sink and it’s perfect. It’s a bit pricey, but it’s absolutely worth it for how compact it is. I also bought this 10L water container which fits in the sliding drawer.
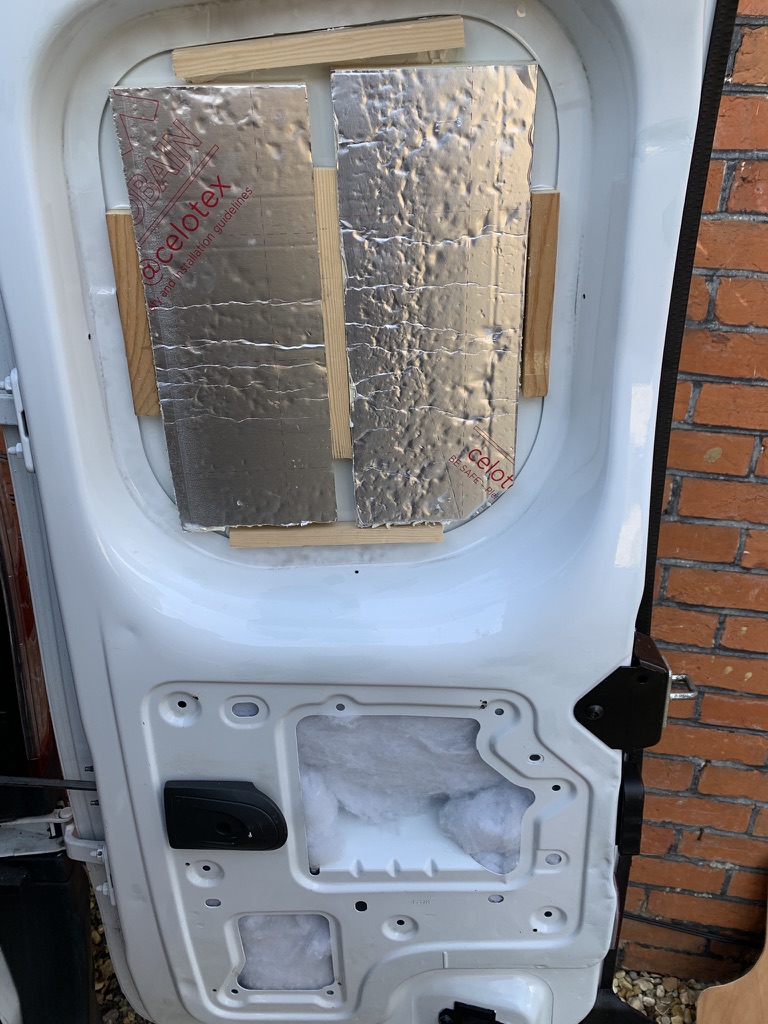
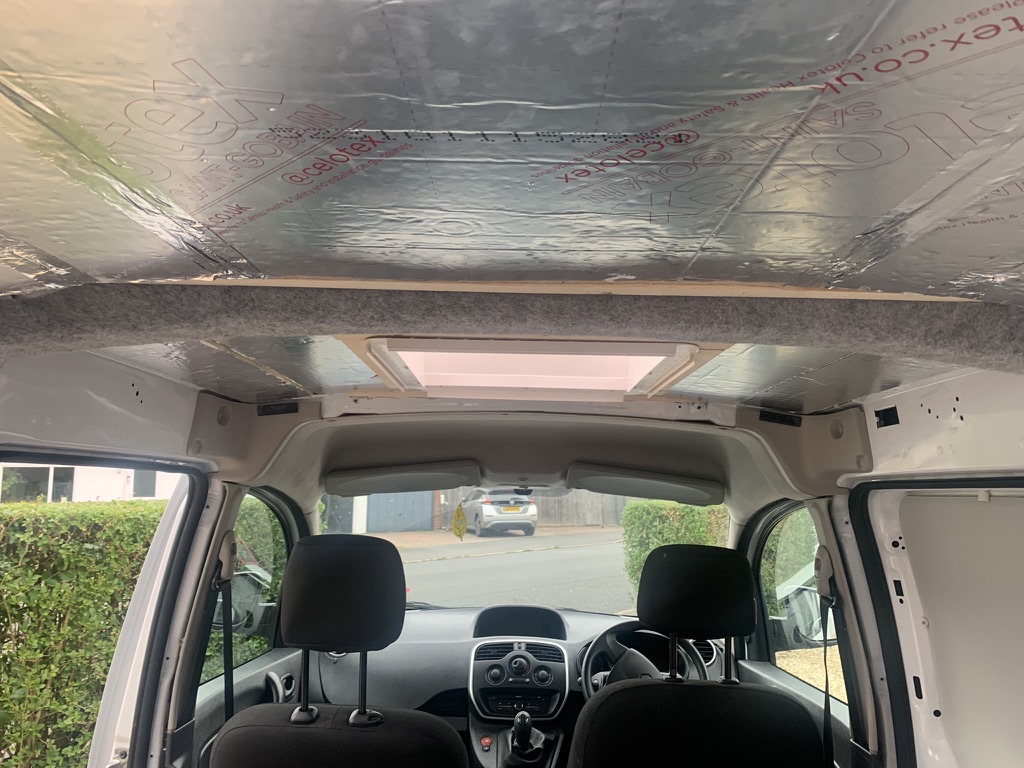
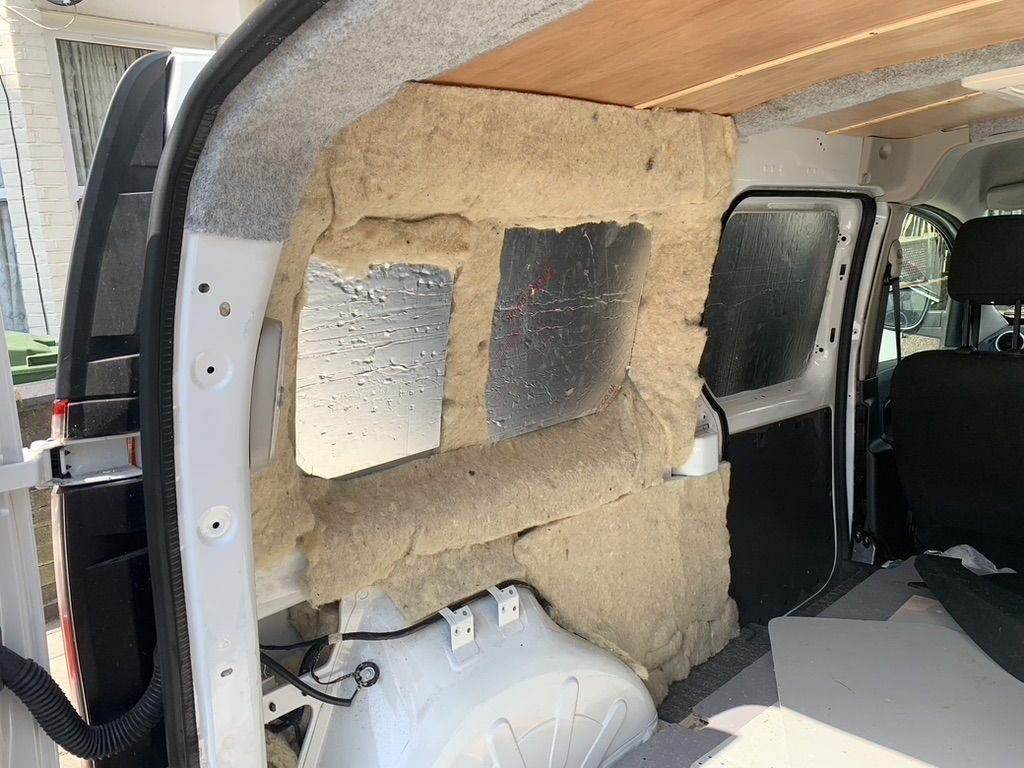
- Insulation – I went into a deep rabbit hole about what insulation material to use. There’s a lot of info out there and a lot of it is contradictory, especially when it comes to if you should use foil insulation to line the whole van or not. My personal conclusion was that lining everything in foil wasn’t worth it. Maybe it was if you could create a complete seal with it and have an air gap, but I was never realistically going to be able to do this. So I went for this 20mm thick PIR board for big flat spaces and this thermafleece sheeps wool for the rest (more sustainable than using the synthetic stuff, and it worked perfectly, although it did smell of a barn for a while).
- Wood for panels – I used 3mm ply for side panels and ceiling which worked well and had good flexibility.
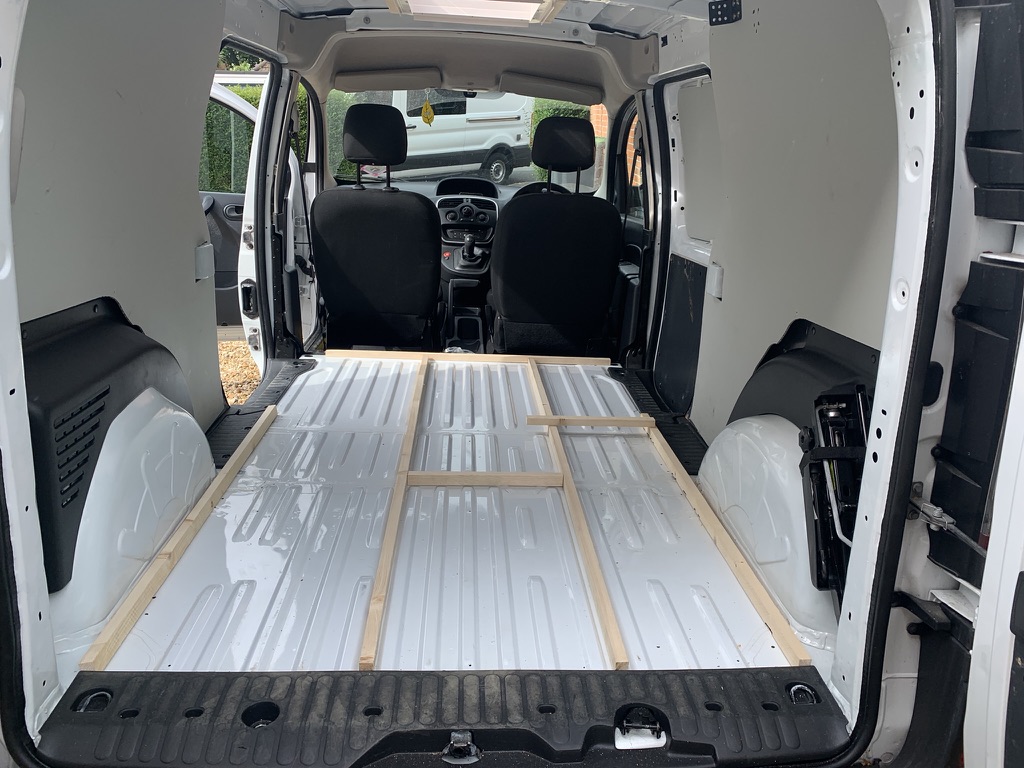
- Wood for main frame – I used 12mm ply for the main frame which worked well and were just thick enough to screw into the ends if needed.
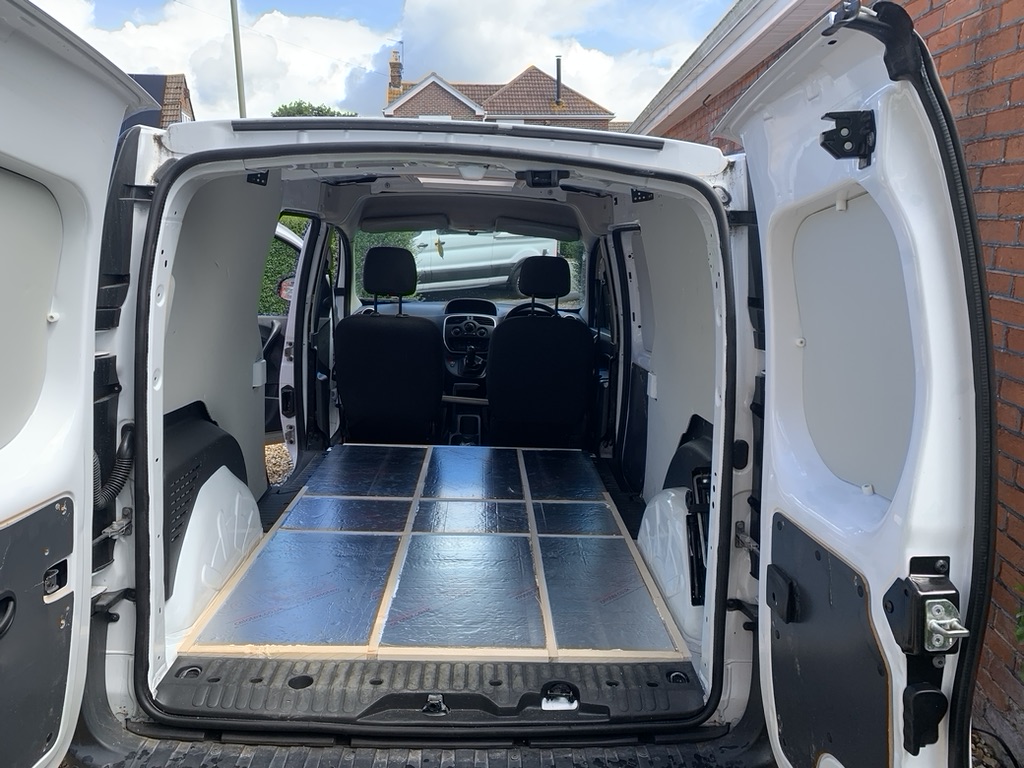
- Floor – I used Karndeen vinyl flooring which was great and easy to put in.
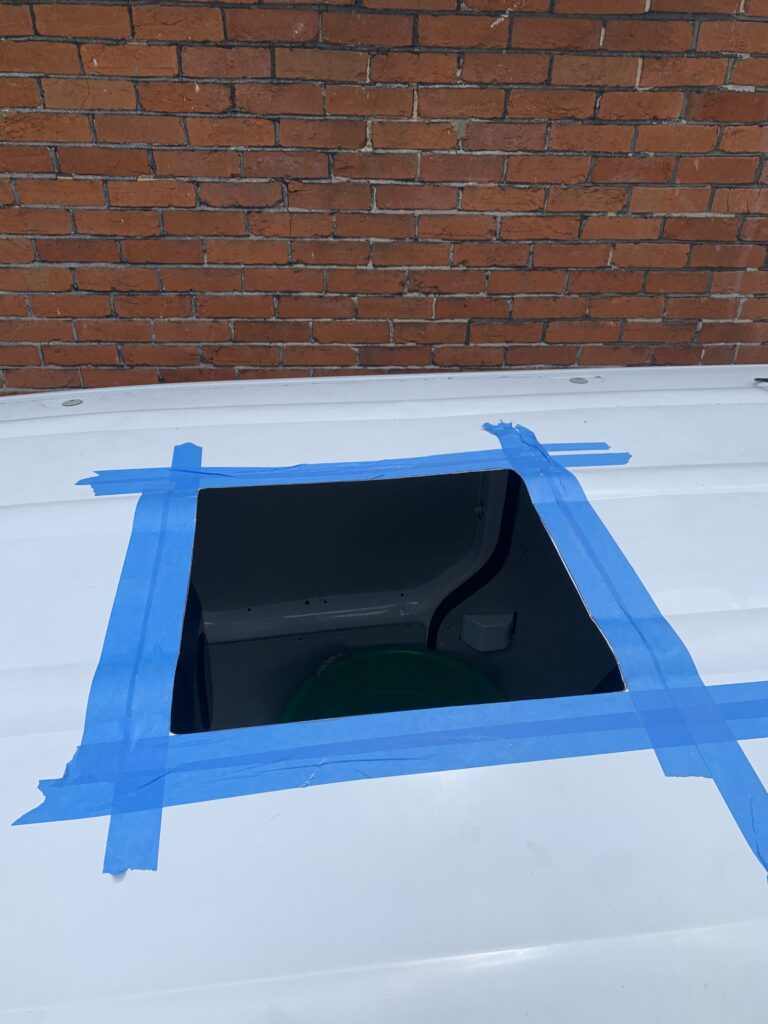
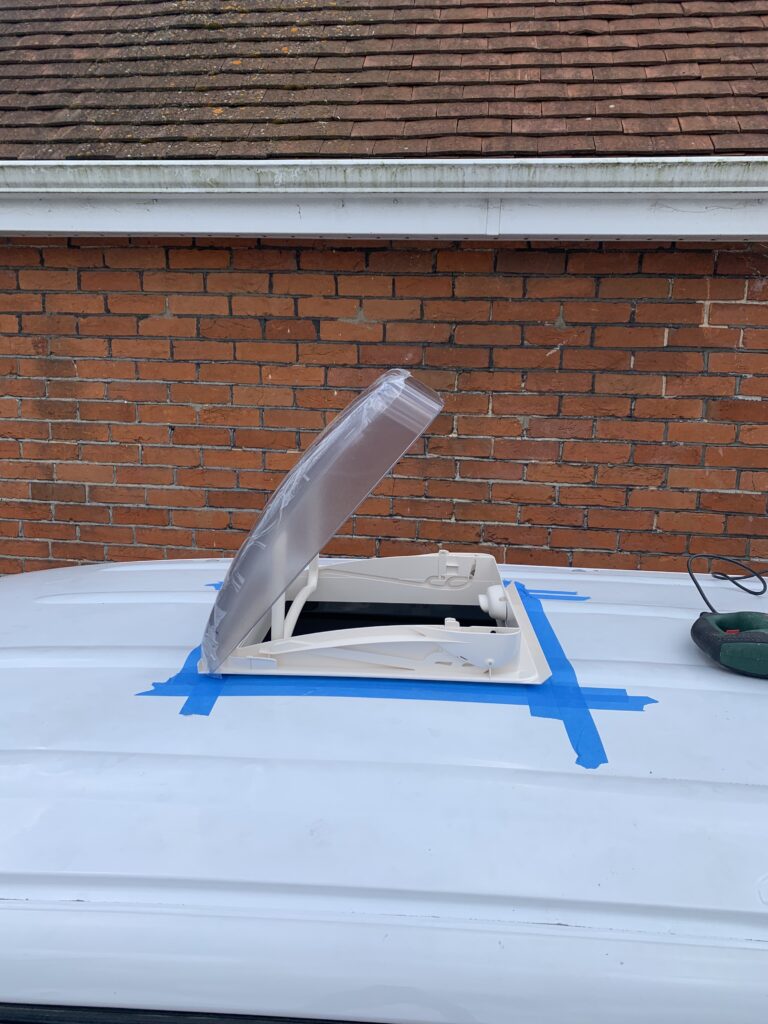
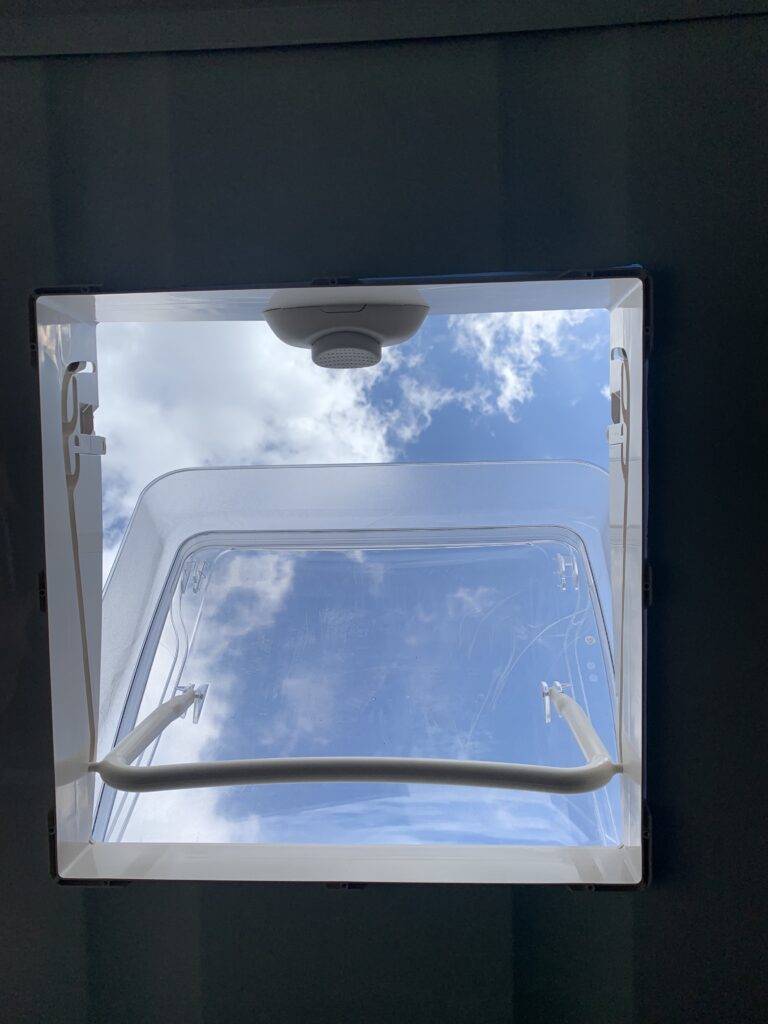
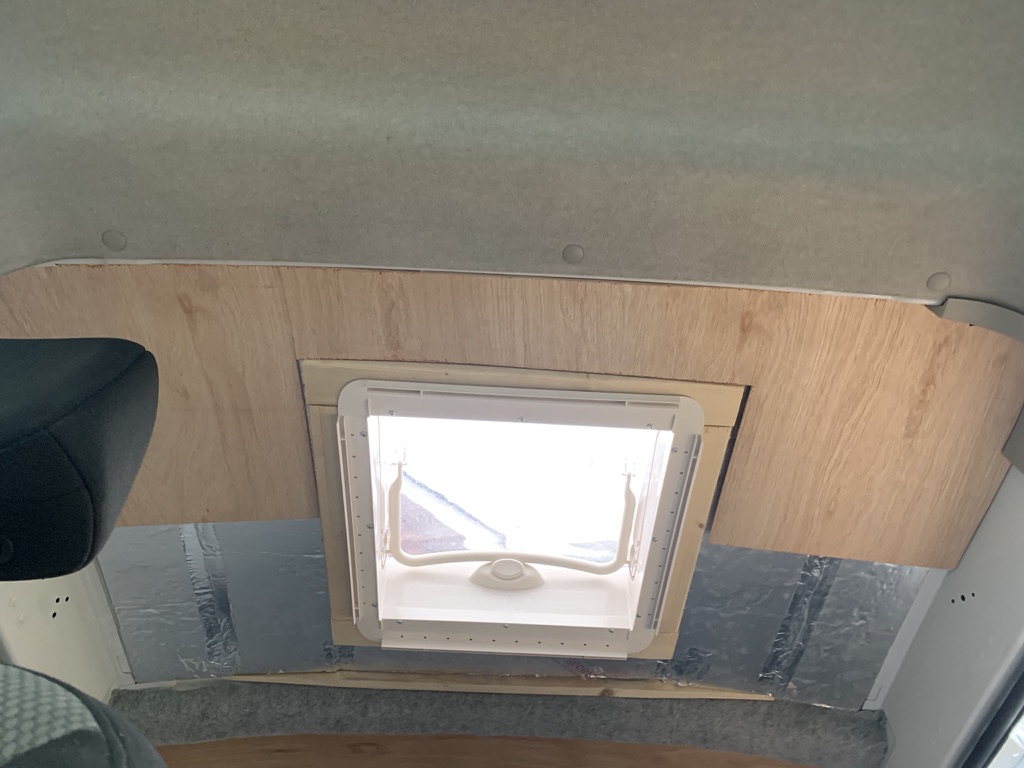
- Skylight – I put in a Dometic Seitz Mini Heki Style Rooflight Vent With Forced Ventilation 400mm x 400mm and black flynet. It’s excellent.
7. Create project plan
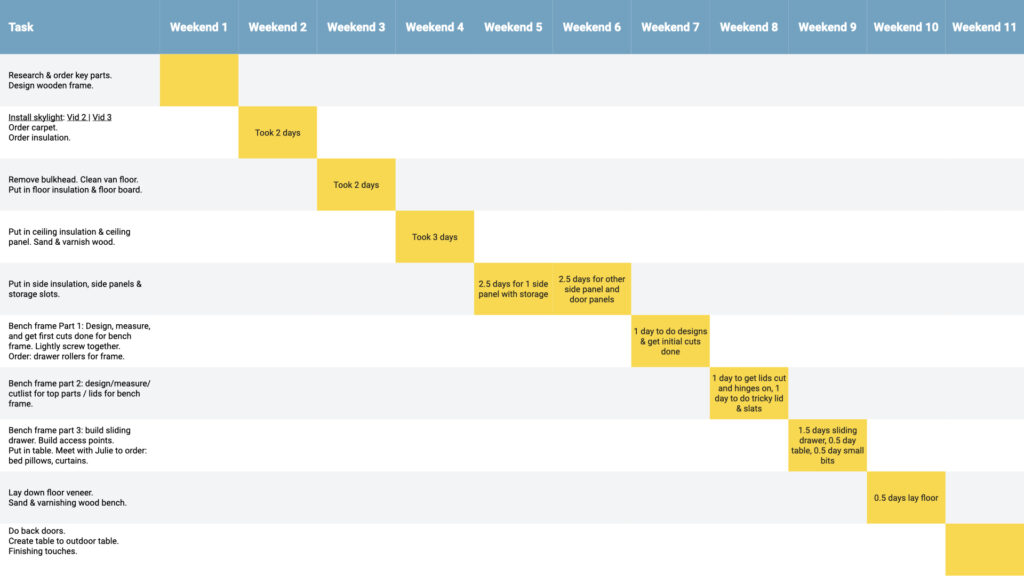
8. The build
For each job the approach was:
- Watch youtube videos
- Create plan (sketches and step by step guide)
- Complete job
High-level steps were:
1. Research & order key parts. Design wooden frame.
2. Install skylight: Youtube video 1 | Youtube video 2
3. Remove bulkhead. Clean van floor. Put in floor insulation & floor board.
4. Put in ceiling insulation & ceiling panel. Sand & varnish wood.
I used this water-based varnish and it was great.
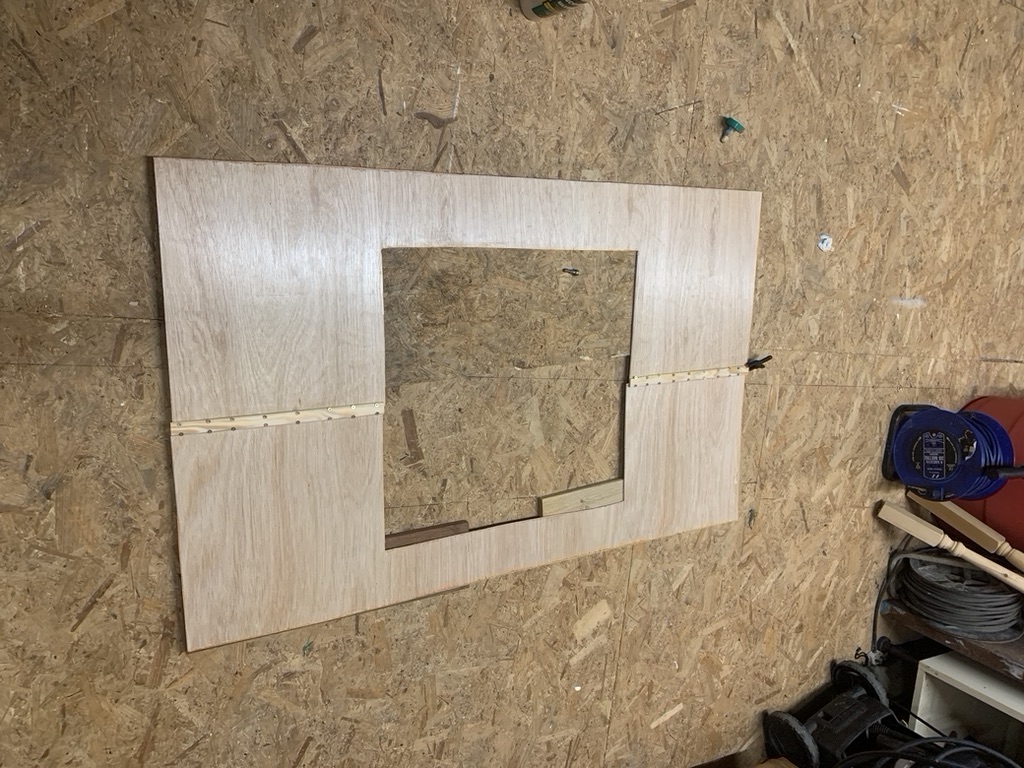
5. Put in side insulation, side panels & storage slots.

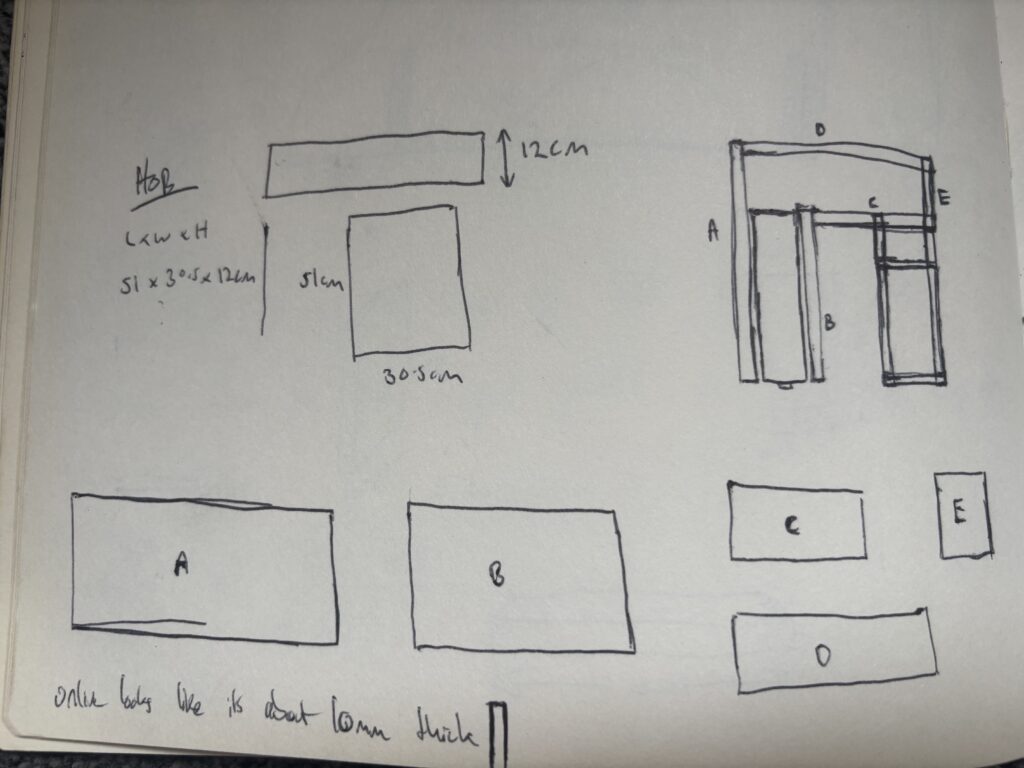
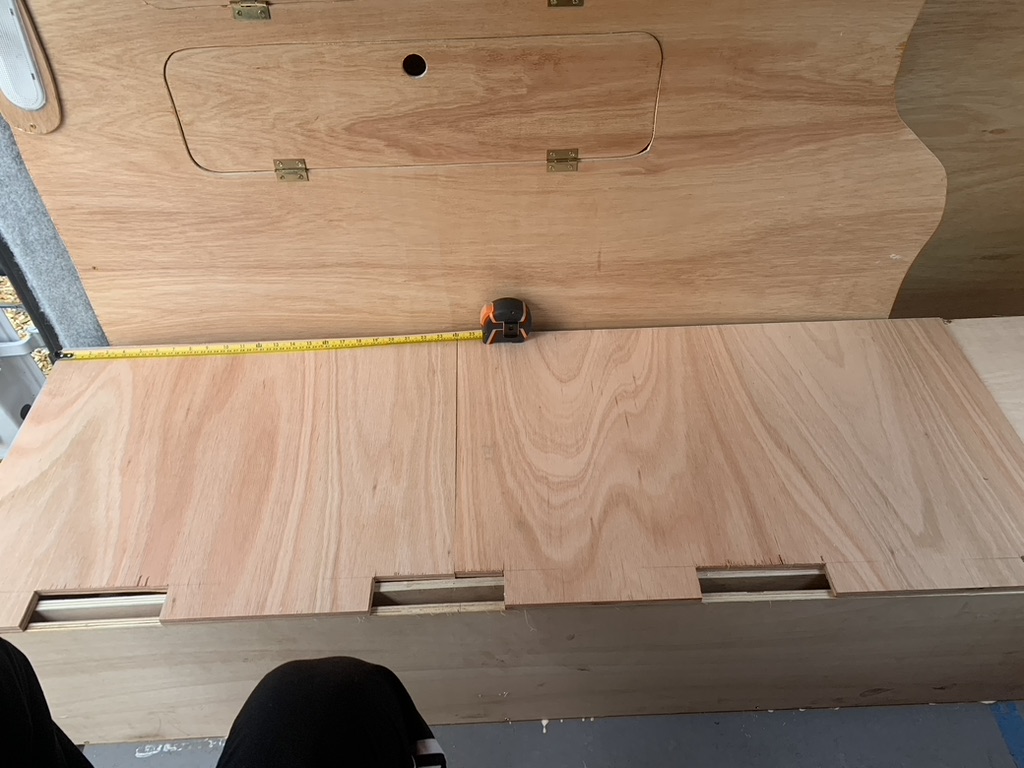
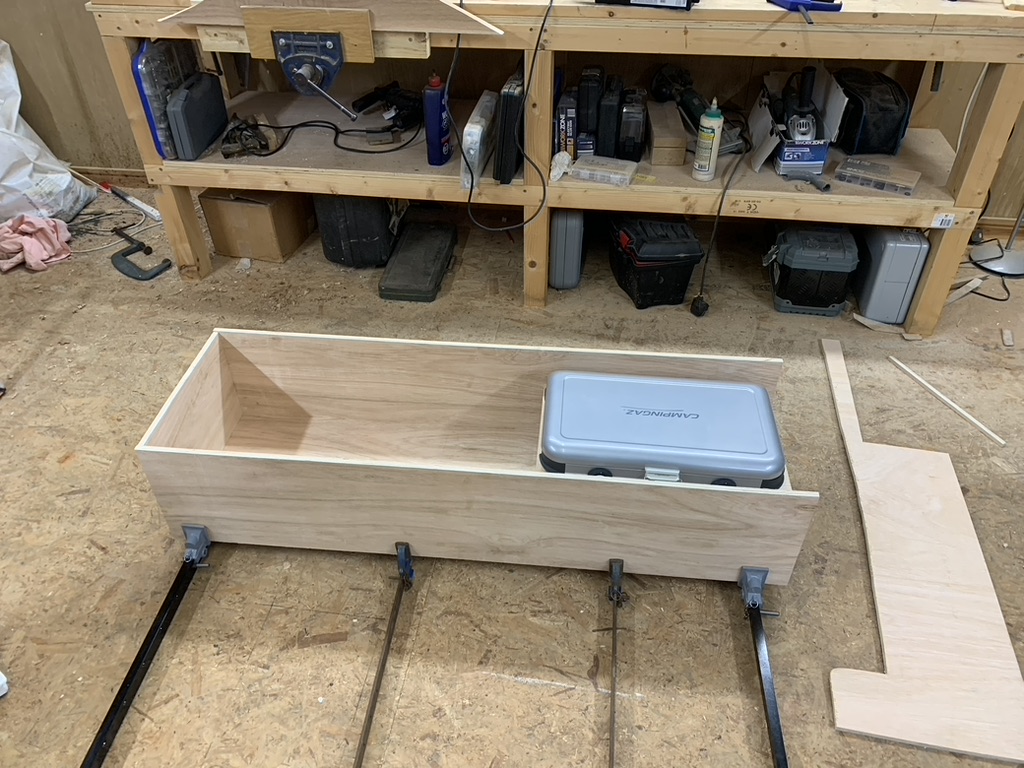
6. Bench frame Part 1: Design, measure, and get first cuts done for bench frame. Lightly screw together. Order drawer rollers for frame.
I used this cutlist planner tool and then got the pieces cut at B&Q which was super helpful.
These heavy duty rollers were perfect.
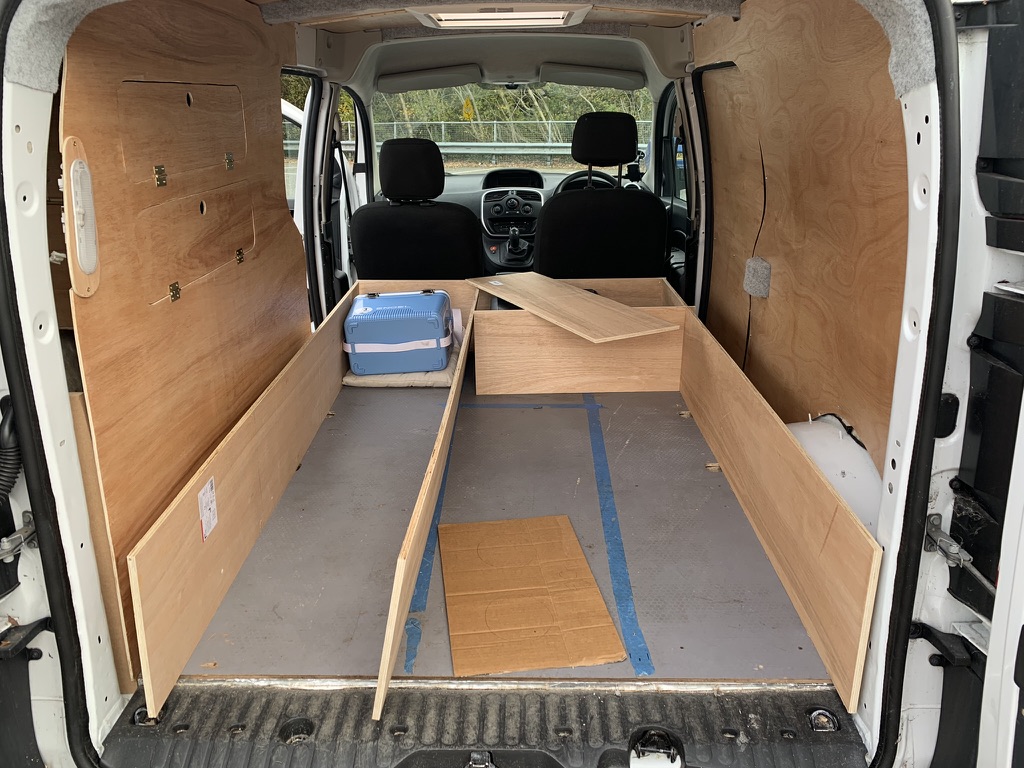
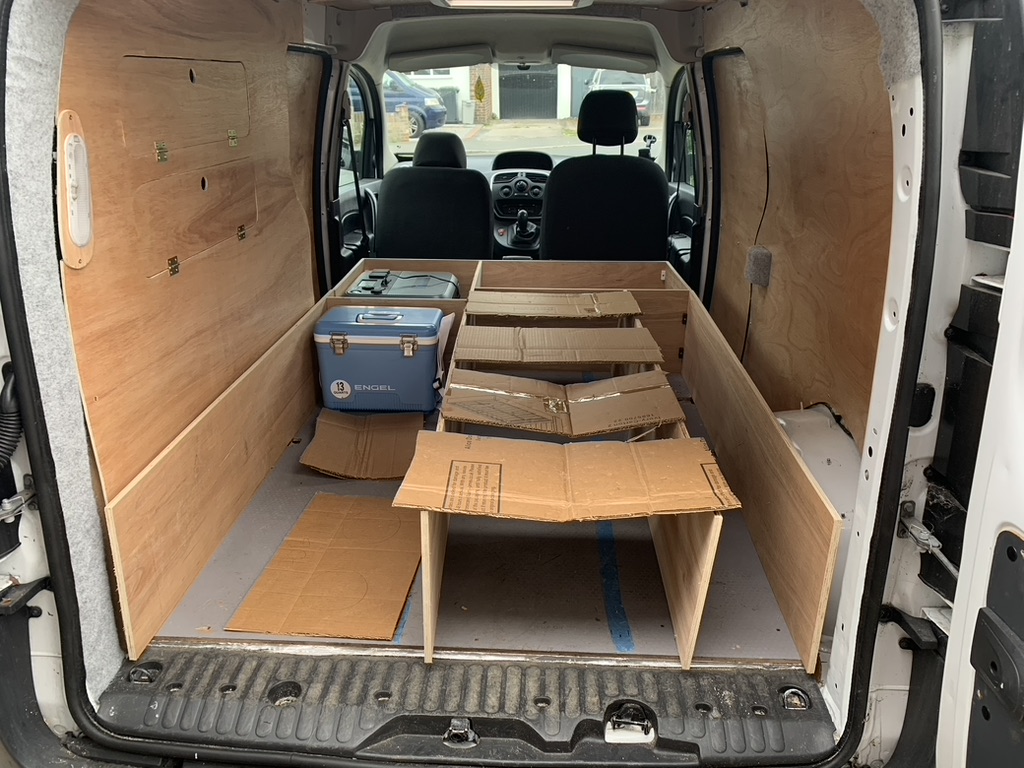
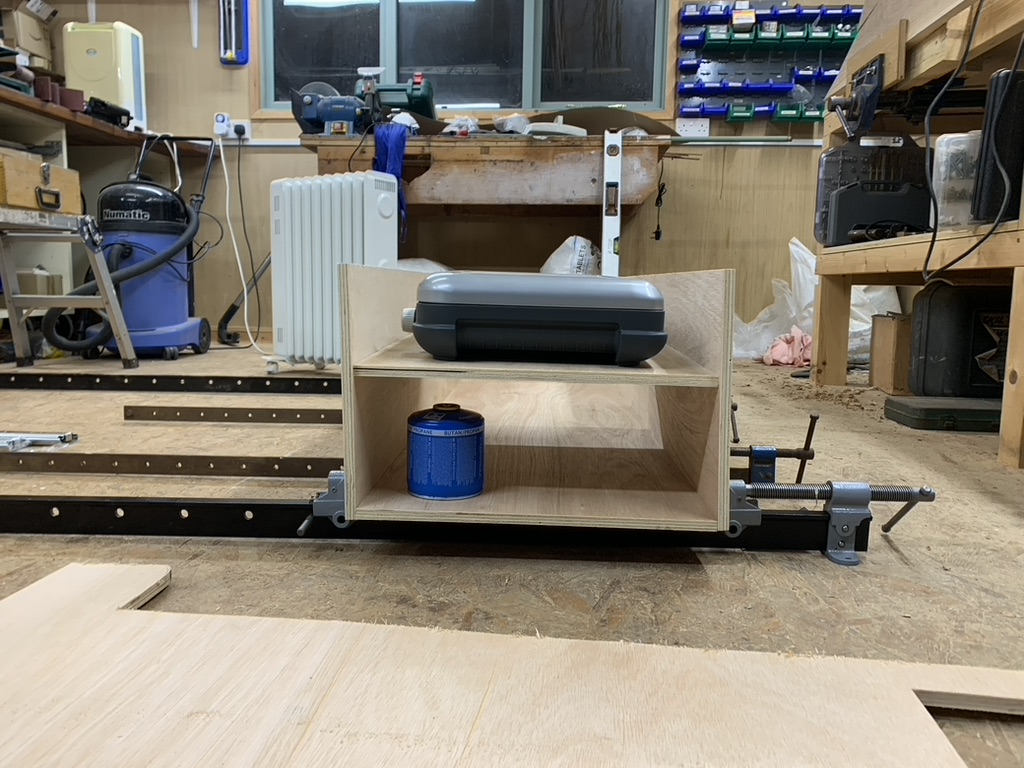
7. Bench frame part 2: Design, measure and get cuts done for top of bench frame.
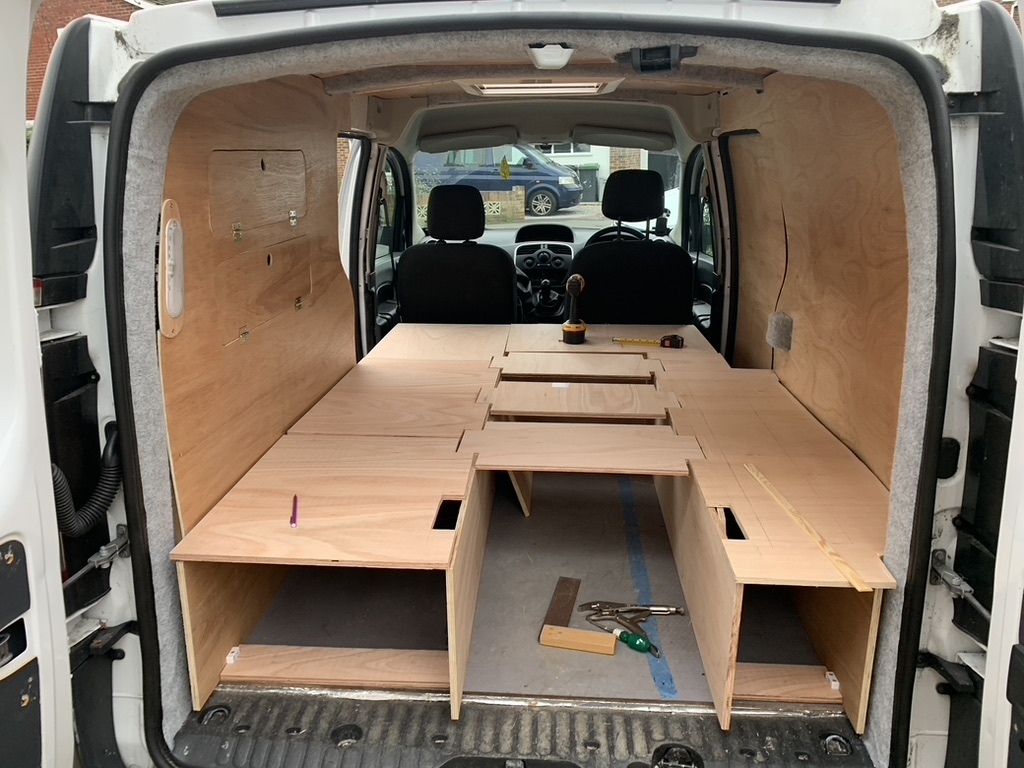
8. Bench frame part 3: Build sliding drawer. Put in table. Order bed pillows, curtains. Order & Install roof rack.
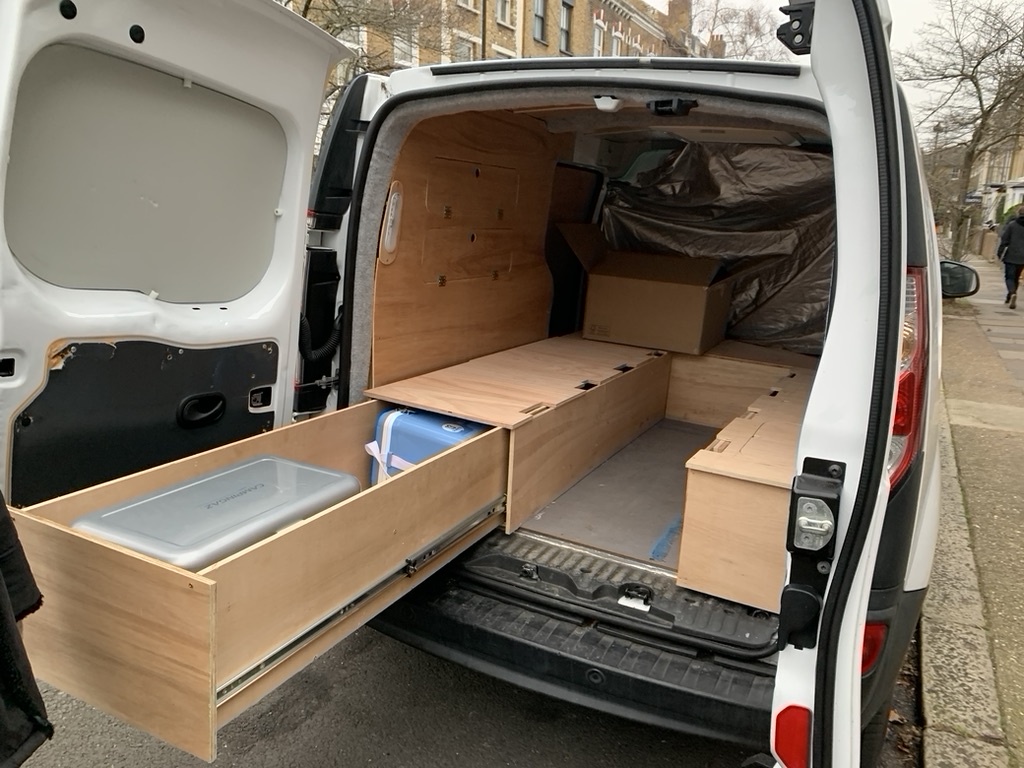
9. Lay down floor veneer. Sand & varnish wood bench. Youtube video I followed.
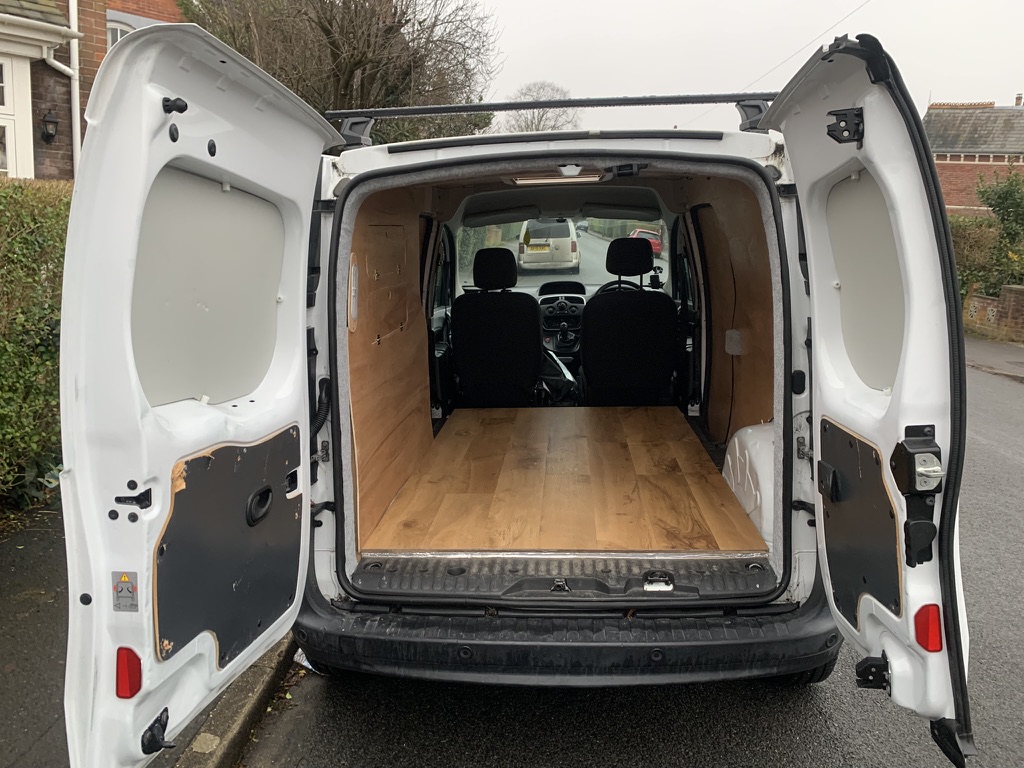
10. Build back doors. Create outdoor table. Do finishing touches.
Used this great video of how to carpet back doors. Definitely worth using some proper textile scissors they were a game changer. This is the carpet I used it worked perfectly.
These are the extra storage nets I used.
For the outdoor table, I used these straps and these hooks.